
I’ve recently been told by a few people that many of my recipes on the site seem to be a little too demanding or time consuming to make. Some of you have even mentioned that during the week it’s impossible to try out the recipes because you have so many other things going on. You’ve asked for more quick and effortless recipes. I really do appreciate the feedback and have been listening intently because it helps me grow as a food blogger. The main reason why I run this site is so that you try out the recipes for yourself. I want you to fall in love with these dishes and make them over and over again, the way that I do, without feeling overwhelmed about it. So if you’re looking for more simple and delicious recipes, without all of the fluff, simple and delicious recipes you shall get.
In honor of this revelation, I’m starting a new series on the site called, “The Classics.” It’s pretty much what you might think it is. For the past few weeks I’ve been toying with the idea of creating and sharing easy recipes of classic dishes we all know and love. Recipes with straightforward ingredients and easy-to-follow, uncomplicated steps. I sometimes take for granted how great it is to get into the kitchen and make really simple dishes. It’s therapeutic almost, to not have to think too much and just cook because it’s soothing. Because it’s fun. It’s so easy to get lost in the marvels of the internet with all these delicious recipes popping up, the kind that combine a couple different dishes into one mega dish. I’m all for those recipes, don’t get me wrong. I mean, you have seen my creations on here, but sometimes it’s important to take a step back and appreciate the classic dishes we grew up with.
I’ll be sharing “The Classics” in installments every few weeks (mixed in with my regular posts) so keep an eye out for them. If you happen to have any suggestions or are dying to see a particular classic on here, let me know by dropping a comment down below. Also, if you try out one of the recipes be sure to hashtag them with (#TCAclassics) on FB, instagram or twitter. (I want to see them!) I’ll keep track of that tag and share the photos as they come in. That’s exciting right? Not as exciting as fried chicken I’m afraid. Speaking of, as you can see, the first installment happens to be fried chicken. The king of all classic dishes, and one of my all-time favorites.

We start off with some bone-in, skin-on, chicken pieces. Sometimes you can find a whole fryer chicken already cut into the eight piece, at the supermarket, and if you can find it, go ahead and use that. I wasn’t so lucky so I just bought a whole chicken and cut it into the eight pieces myself. It’s not as easy as it sounds, if I’m being honest, but with a sharp knife, you can do it.
**Note: I also bought a few extra legs because the leg is my favorite part of the chicken, especially when it’s fried.**
Place the pieces of chicken on a wire rack (set over a baking sheet), in a single layer. If your chicken has that slimy stuff on it, pat it dry with a few paper towels.
**Note: Make sure you sanitize the sink, counters, cutting board, and knife (anything that has come in contact with the chicken) really well after you’ve washed and handled the chicken. Raw chicken can cause some serious illness if you’re not careful with it. It’s always better to be too careful than not enough when it comes to chicken.**
Season the chicken liberally with salt and pepper on both sides. This step isn’t necessary but I recommend it because, you know me, I like to season every step of the way.
In a large bowl add the buttermilk and season with salt, pepper, garlic powder, onion powder, dried thyme, Old Bay Seasoning, paprika, hot sauce and Worcestershire sauce. Mix until evenly combined. Drop in the chicken pieces making sure to fully submerge them in the buttermilk.
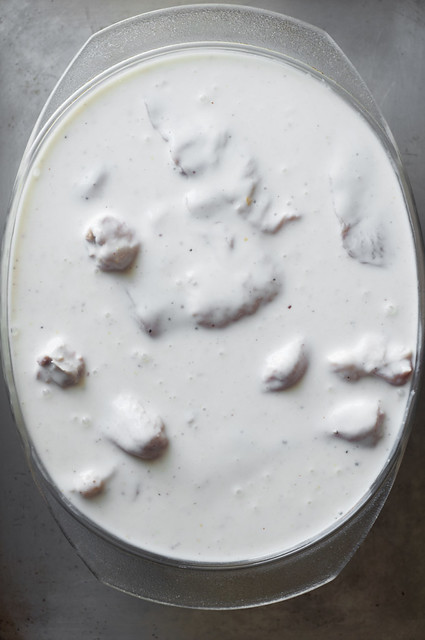
Cover the bowl with plastic wrap and allow to chill for at least 1 hour or up to overnight.
Once you’re ready to fry it, dump the flour into a large bowl. Season the flour with salt, pepper, garlic powder, onion powder, paprika, dried thyme, and Old Bay Seasoning. Pretty much everything we used in the buttermilk. Whisk to evenly combine.

Working with one or two pieces of chicken at a time, transfer it from the buttermilk to the seasoned flour. Toss around and pat it down on all sides to make sure the chicken is fully coated with flour. Shake off the excess and place on a wire rack positioned over a baking sheet.
**Tip: For a super crispy crust, double dip your chicken, dunking it into the buttermilk and flour twice. That will create a thicker more crunchier crust once you fry it!**

Continue dredging the chicken in the seasoned flour until all the pieces are fully coated. It might take a while doing it one by one or two at a time, but this will ensure that each chicken piece is coated well. Trust me.
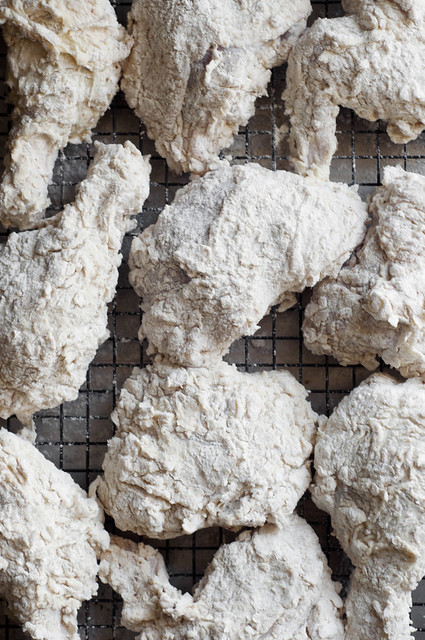
Have you ever made fried chicken—or anything else that has a coating and is deep fried—and the coating has fallen off or doesn’t seem to stick? That is a common mistake and happens to a lot of people. You are not alone. A good tip to prevent that is to allow your chicken (or anything else you’ve coated and plan on frying) to sit and dry out for a few minutes.
**Tip: Letting the chicken rest on the wire rack for about 10 minutes before frying dries out the breading a bit, making it stick to the chicken. Then when you go to fry it, the flour crust won’t fall off!**
In the meantime, heat a large pot (or shallow cast iron skillet) over medium-high heat. It should be filled about ¾ of the way up with vegetable oil but not too much that it will overflow causing a major accident when you start frying.
A deep fryer or candy thermometer is your best friend for this task. I found one on Amazon that works well. (Find it here). Attach it to the edge of the pot and allow the oil to heat up to around 320ºF. Once the oil has reached that temperature, drop in a couple pieces of chicken at a time.
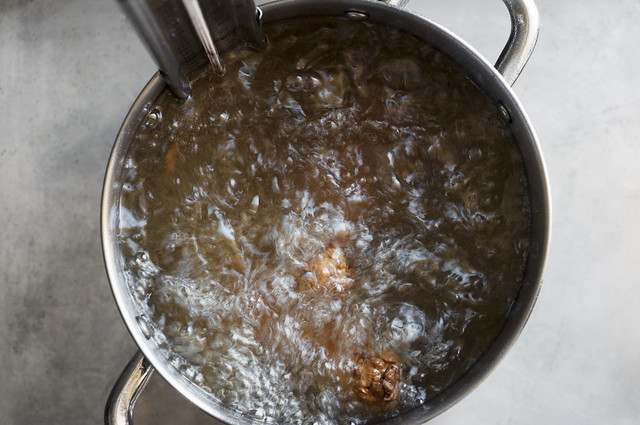
**Tip: Do not overcrowd the pot by trying to fry a lot of chicken all at once. I fried it in batches, frying similar pieces with similar pieces so that they cook at the same time.**
Since this chicken does have bone, you want to make sure you cook it long enough so that the inside is fully cooked. I fried the chicken pieces for about 10 to 12 minutes, turning them around in the oil every so often to ensure even browning.
Once the chicken’s internal temperate is about 165ºF you can remove it from the oil and transfer it to a wire rack set over a baking sheet. (A CLEAN ONE!) Continue frying until all the chicken has been fried.
**Note: Each time you add a batch of chicken to fry, the temperature will drop a bit. Raise or lower the heat, accordingly, to maintain that 320ºF temperature of the oil.**

Rewarm the chicken in the oven, by placing it in the oven for a few minutes, until hot. You can do that, it’s an extra step, or you can just eat the chicken cold, like I do. A lot of people can have cold food without a problem and I can relate with that, for the most part, but I do have to say that out of all the cold food I’ve eaten in my twenty five years of living, cold chicken happens to be my favorite. There’s nothing better than eating cold fried chicken just as soon as you wake up.

As crazy as it sounds I love the idea of making and bringing fried chicken to a picnic or backyard gathering. It’s out there and off because hello, you’re bringing fried chicken to the party, but at the same time it’s absolutely genius. You can just serve it at room temperature without having to worry about reheating it, so it makes for the perfect picnic or party dish. Plus, the look on people’s faces when they see the fried chicken is priceless.


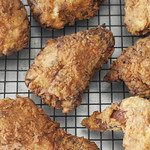
One last tip before I go: Do not transfer the chicken from the oil to a plate lined with paper towels or leave the chicken sitting directly on a baking sheet or plate. These are all ways to make your chicken soggy, and fast at that! Instead, I recommend placing the golden brown fried chicken on a wire rack as you continue to fry. The air circulates through the bottom preventing the chicken to steam cook until it gets soggy. No soggy chicken for you or me. Enjoy!

The Classics: Buttermilk Fried Chicken
Ingredients
For the buttermilk marinade
- 1 whole chicken cut into eight pieces
- 3 cups buttermilk
- ½ teaspoon salt
- ½ teaspoon black pepper
- 1 teaspoon Old Bay Seasoning
- ½ teaspoon garlic powder
- ½ teaspoon onion powder
- ½ teaspoon paprika
- ¼ teaspoon ground thyme
- 2 to 6 dashes hot sauce such as Tabasco
- 1 teaspoon Worcestershire sauce
For the four coating
- 3 cups all-purpose flour
- ½ teaspoon salt
- 1 teaspoon black pepper
- 1 teaspoon Old Bay Seasoning
- ½ teaspoon garlic powder
- ½ teaspoon onion powder
- ½ teaspoon paprika
- ¼ teaspoon ground thyme
- Vegetable oil for frying
Instructions
- Place chicken pieces on a wire rack set over a baking sheet. Season with a bit of salt and pepper on both sides. Allow to sit for a few minutes.
- In a large bowl, combine the buttermilk, salt, pepper, Old Bay Seasoning, garlic powder, onion powder, paprika, thyme, hot sauce and Worcestershire sauce. Stir to evenly combine. Add in the chicken and toss to fully coat. Make sure you nestle in the chicken so that it's fully submerged into the buttermilk. Cover with plastic wrap and refrigerate for at least 1 hour (or up to overnight).
- In a large bowl, combine the flour and seasonings. Mix to fully combine. Working with a couple of chicken pieces at a time, transfer them from the buttermilk to the seasoned flour. Toss the chicken and pat it around the flour to make sure each piece is evenly coated. Place on a wire rack set over a baking sheet. Continue dredging the chicken until each piece is coated. Allow to sit for about 10 minutes.
- Heat a large heavy duty pot, filled ¾ of the way up with vegetable oil, to 320°F. Check the temperature with a deep fry or candy thermometer. Once the oil is hot, drop in a few pieces of chicken at a time and cook for about 10 to 12 minutes or until the inside of the chicken registers to 165°F with a thermometer. Transfer the chicken to a clean wire rack set over a baking sheet. Do not place it directly on a place or paper towels or anything, because it will cause the chicken to steam and get soggy.
- Keep an eye on the temperature of the oil as it may drop each time you add a new batch of chicken to fry. Raise and lower the heat accordingly to keep it at a steady 320°F.
- Continue frying until all the chicken is done. Rewarm in the oven for a few minutes to heat through again. Serve warm or at room temperature. Enjoy!
This looks absolutely heavenly. Your pictures are BEAUTIFUL. I want fried chicken so bad right now.
I know you said to properly sanitize everything afterwards, the current recommendation is to not wash your chicken at all. It will only spread the bacteria more easily all over your sink, hands, counter – all over the place. And also doesn’t get rid of any bacteria properly. So just for any other lazy people out there, not washing the chicken is not only easier, but also safer!
I am hoping this protip qualifies for some crispy chicken in the mail, yes? 😀
i hardly deep fry things at home but i loveeeeeee crispy fried chicken, you have made it look sooo easy.
I don’t have a fryer and don’t really want to use quite that much oil, can I use a cast iron skillet and fry with about an inch or two of hot oil?
Hello Meg! Yes of course, you can definitely use a cast iron skillet. Just turn the chicken halfway through to ensure even browning!
I LOVE fried chicken, but we so rarely have it. I used to do it for picnics every once in a while, too! It’s the best for that. You’ve inspired me to make it again soon. These photos make it look just too tempting!
I don’t think there’s anything better than fried chicken. And this reminds me that I’ve not made it all year.
I’m reading this article at 9 am and yet, I’m really really hungry for fried chicken right now! I don’t suppose that I could get you to just bring me a piece at work? 😉
Tried this tonight with boneless, skinless chicken thighs and it was a special kind of awesome. I was only able to let the thighs soak for 90 min. but would probably put them in the buttermilk in the morning and fry them that night if I did it again. I also did the double dip (especially since they are skinless) and fried them in a deep fry pan rather than a full deep fat fry. I will never crave popeyes again 🙂
I’m so glad you enjoyed it!! That makes me happy! (Watch out Popeyes).
I follow you on Instagram and I’ve never actually visited your site (I know, I know, don’t hate me) anyways, I’m here now. I just wanted to say that I love your pictures. And I love fried chicken. So this seemed like the appropriate post to comment on. I love fried chicken hot and crispy and I too love it cold the next day!
Starting this month I will be making two of your recipes and vlogging/blogging about them each month kicking off this one this upcoming weekend. Can’t wait to see how it turns out.
can I use plain flour?
Hi James, of course! by all means, use plain flour!